Notice
Recent Posts
Recent Comments
Link
| 일 | 월 | 화 | 수 | 목 | 금 | 토 |
|---|---|---|---|---|---|---|
| 1 | 2 | 3 | ||||
| 4 | 5 | 6 | 7 | 8 | 9 | 10 |
| 11 | 12 | 13 | 14 | 15 | 16 | 17 |
| 18 | 19 | 20 | 21 | 22 | 23 | 24 |
| 25 | 26 | 27 | 28 | 29 | 30 | 31 |
Tags
- programmers
- queue
- 백준
- pandas
- 데이터시각화
- MySQL
- Algorithm
- python
- 선그래프
- openCV
- String Method
- 알고리즘 스터디
- dataframe
- Stack
- 프로그래머스
- 알고리즘
- NumPy
- Matplotlib
- 코딩테스트
- 파이썬
- 가상환경
- Selenium
- type hint
- javascript
- 정보처리기사 c언어
- aws jupyter notebook
- Join
- 노마드코딩
- 알고리즘스터디
- 자료구조
Archives
- Today
- Total
조금씩 꾸준히 완성을 향해
[OpenCV/Python] 영상접근법(화소접근, 컬러접근, ROI, 복사, 컬러 채널 분리&병합, 색변환, 기하변환, 기본연산) 본문
Python/OpenCV
[OpenCV/Python] 영상접근법(화소접근, 컬러접근, ROI, 복사, 컬러 채널 분리&병합, 색변환, 기하변환, 기본연산)
all_sound 2022. 11. 12. 14:28# numpy.ndarray로 영상표현
import cv2
import numpy as np
- 화소 접근 방법
img = cv2.imread('./lena.jpg')

print('img.ndim=', img.ndim)
print('img.shape=', img.shape)
print('img.dtype=', img.dtype)
# img.ndim= 3
# img.shape= (512, 512, 3)
# img.dtype= uint8

img = img.astype(np.int32)
print('img.dtype=', img.dtype)
# img.dtype= int32

img = np.uint8(img)
print('img.dtype=', img.dtype)
# img.dtype= uint8
# 이미지를 데이터 프레임으로 보기
import pandas as pd
img = cv2.imread('./lena.jpg', 0)
pd.DataFrame(img)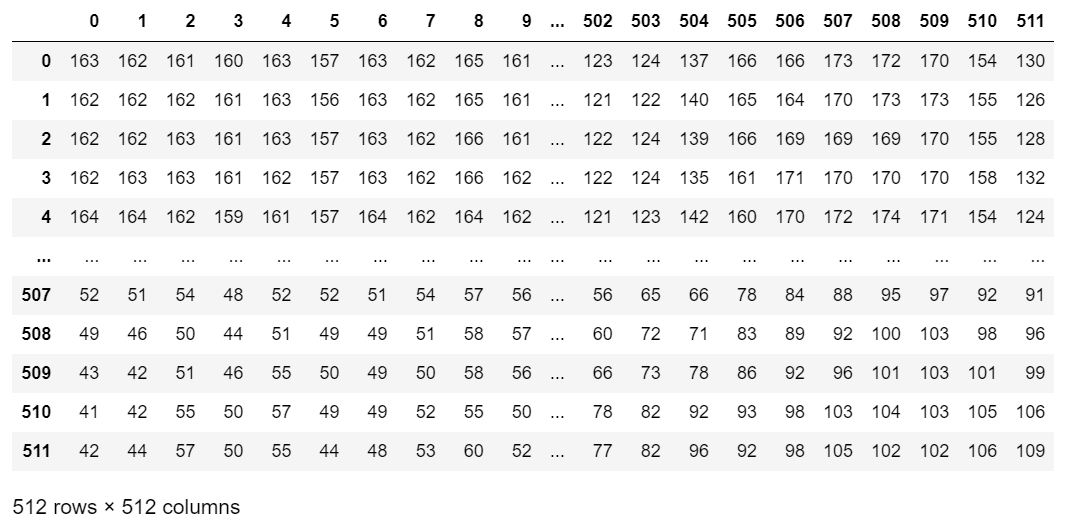
- 원본 이미지와 차원변경 거친 이미지 확인
# 원본 이미지
img1 = cv2.imread('./lena.jpg', 0)

# 차원 변경 후 복원 이미지
img2 = img1.flatten()
img2 = img2.reshape(512, 512)
img2.shape
# (512, 512)
# 두 이미지 비교
cv2.imshow('original', img1)
cv2.imshow('restored', img2)
cv2.waitKey()
cv2.destroyAllWindows()
# numpy와 OpenCV 자료형
- 컬러 접근 및 설정
img = cv2.imread('./lena.jpg', cv2.IMREAD_GRAYSCALE)
img_bgr = cv2.imread('./lena.jpg', cv2.IMREAD_COLOR)
# 20, 30 위치의 밝기값을 val에 저장
print(img[30, 20]) #흑백 : 밝기 값이 하나밖에 없음
print(img_bgr[30, 20]) #컬러 : 세 개의 channel
# 161
# [111 136 228]# 200, 100 위치의 밝기값을 50으로 설정
img[100, 200] = 0
print(img[100, 200]) # 0cv2.imshow('new', img[90:110, 150:210])
cv2.waitKey()
cv2.destroyAllWindows()# 관심영역(ROI)
import numpy as np
import cv2

img = cv2.imread('./lena.jpg', cv2.IMREAD_GRAYSCALE)
h, w = img.shape
print(h, w)
# 512 512

cy, cx = h//2, w//2  # 이지미의 센터 값 저장
print(cy, cx)
# 256 256
# 왼쪽 위 원점부터 중간점까지 사각형 영역을 ROI에 저장
roi = img[0:cy, 0:cx]
# 원본이미지와 ROI 이미지 출력
cv2.imshow('new', img)
cv2.imshow('ROI', roi)
cv2.waitKey()
cv2.destroyAllWindows()
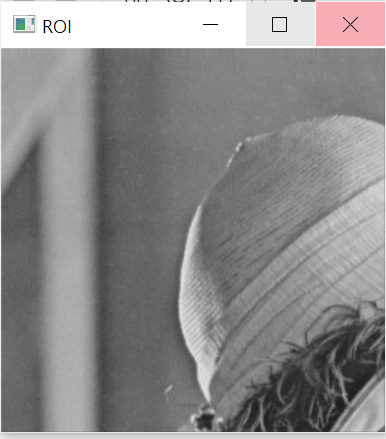
# lena 얼굴만 출력
roi = img[200:395, 200:370]

cv2.imshow('ROI', roi)
cv2.waitKey()
cv2.destroyAllWindows()
# 영상 복사
# copy
src = cv2.imread('./lena.jpg', cv2.IMREAD_GRAYSCALE)
dst = src.copy()
- 레나의 원본영상, 레나의 얼굴만 검정색으로 마스크 씌워진 영상 출력
dst[200:390, 200:370] = 0
cv2.imshow('src', src)
cv2.imshow('dst', dst)
cv2.waitKey()
cv2.destroyAllWindows()
- src 영상을 각각 b, g, r 층으로 copy해서 컬러로 변환
# src 영상을 각각 b, g, r 층으로 copy해서 컬러로 변환
src = cv2.imread('./lena.jpg', cv2.IMREAD_GRAYSCALE) #흑백
dst = np.zeros([512, 512, 3])
dst[:, :, 0] = src.copy()
dst[:, :, 1] = src.copy()
dst[:, :, 2] = src.copy()
for i in range(dst.shape[0]):
for j in range(dst.shape[0]):
dst[i, j] = [dst[i, j, 0], dst[i, j, 1], np.random.randint(0, 255)]
cv2.imshow('dst', np.uint8(dst))
cv2.waitKey()
cv2.destroyAllWindows()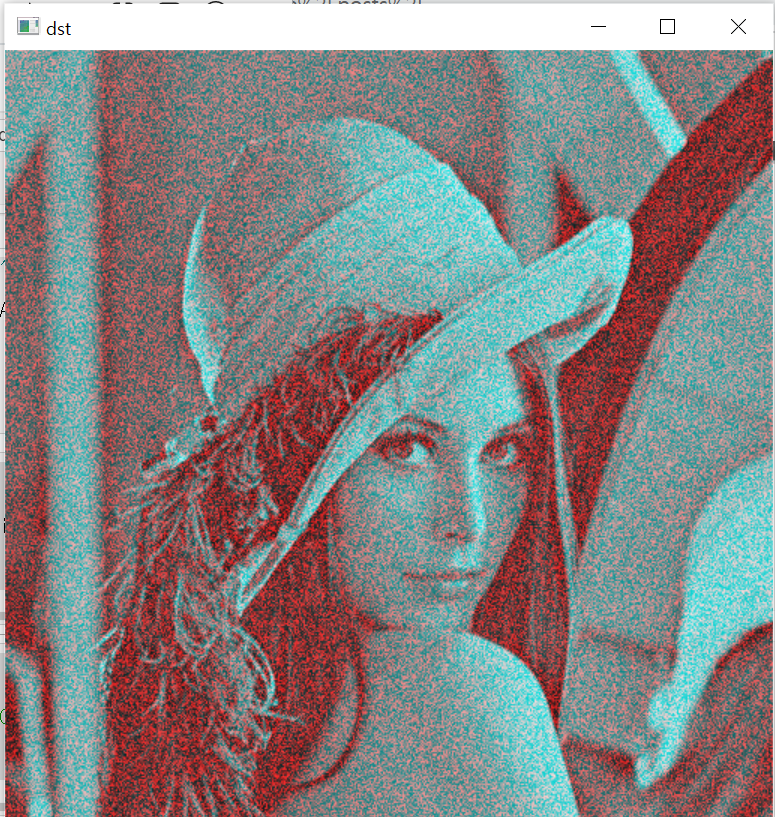
for i in range(dst.shape[0]):
    for j in range(dst.shape[0]):
        dst[i, j] = [np.random.randint(0, 255), dst[i, j, 0], dst[i, j, 1]]
cv2.imshow('dst', np.uint8(dst))
cv2.waitKey()
cv2.destroyAllWindows()
for i in range(dst.shape[0]):
    for j in range(dst.shape[0]):
        dst[i, j] = [dst[i, j, 0],np.random.randint(0, 255), dst[i, j, 1]]
cv2.imshow('dst', np.uint8(dst))
cv2.waitKey()
cv2.destroyAllWindows()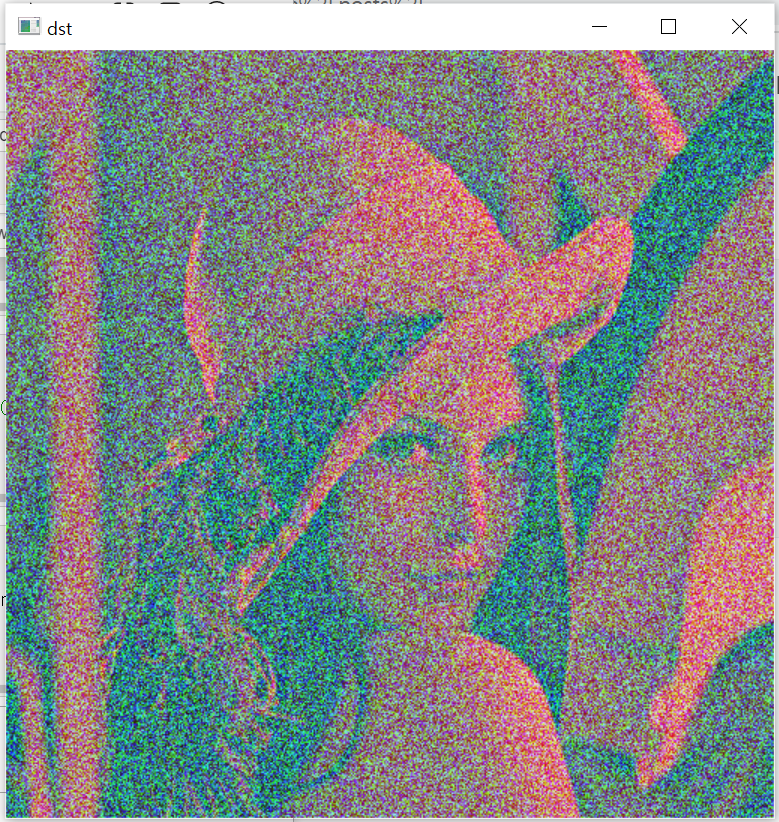
# 컬러 영상 채널 분리와 병합
- 채널 분리
- cv2.split() : 다중 채널 => 단일 채널 영상들
- 채널 병합
- cv2.merge() : 단일 채널 영상들 => 다중 채널 영상
src = cv2.imread('./lena.jpg')
src.shape
# (512, 512, 3)
# 채널 분리
print(cv2.split(src)[0].shape) # blue channel
print(cv2.split(src)[1].shape) # green channel
print(cv2.split(src)[2].shape) # red channel
# (512, 512)
# (512, 512)
# (512, 512)b = cv2.split(src)[0]
g = cv2.split(src)[1]
r = cv2.split(src)[2]# 각 채널 출력
cv2.imshow('b', b)
cv2.imshow('g', g)
cv2.imshow('r', r)
cv2.waitKey()
cv2.destroyAllWindows()
# 채널 병합
cv2.merge([b, g, r]).shape
# (512, 512, 3)
# 병합된 이미지 출력
merged = cv2.merge([b, g, r])
cv2.imshow('merged', merged)
cv2.waitKey()
cv2.destroyAllWindows()
# cvtColor (색 공간 변환)
import numpy as np
import cv2
src = cv2.imread('./lena.jpg') #original
gray = cv2.cvtColor(src, cv2.COLOR_BGR2GRAY) #gray로 변환
yCrCv = cv2.cvtColor(src, cv2.COLOR_BGR2YCrCb) #yCrCv로 변환
hsv = cv2.cvtColor(src, cv2.COLOR_BGR2HSV) #hsv로 변환
# 각 이미지들 확인
cv2.imshow('src', src)
cv2.imshow('gray', gray)
cv2.imshow('yCrCv', yCrCv)
cv2.imshow('hsv', hsv)
cv2.waitKey()
cv2.destroyAllWindows()
# YCbCr의 Y는 휘도 성분, Cb와 Cr은 색차 성분(YCC)
# HSV의 H는 색상(Hhu), 채도(Saturation), 명도(Value)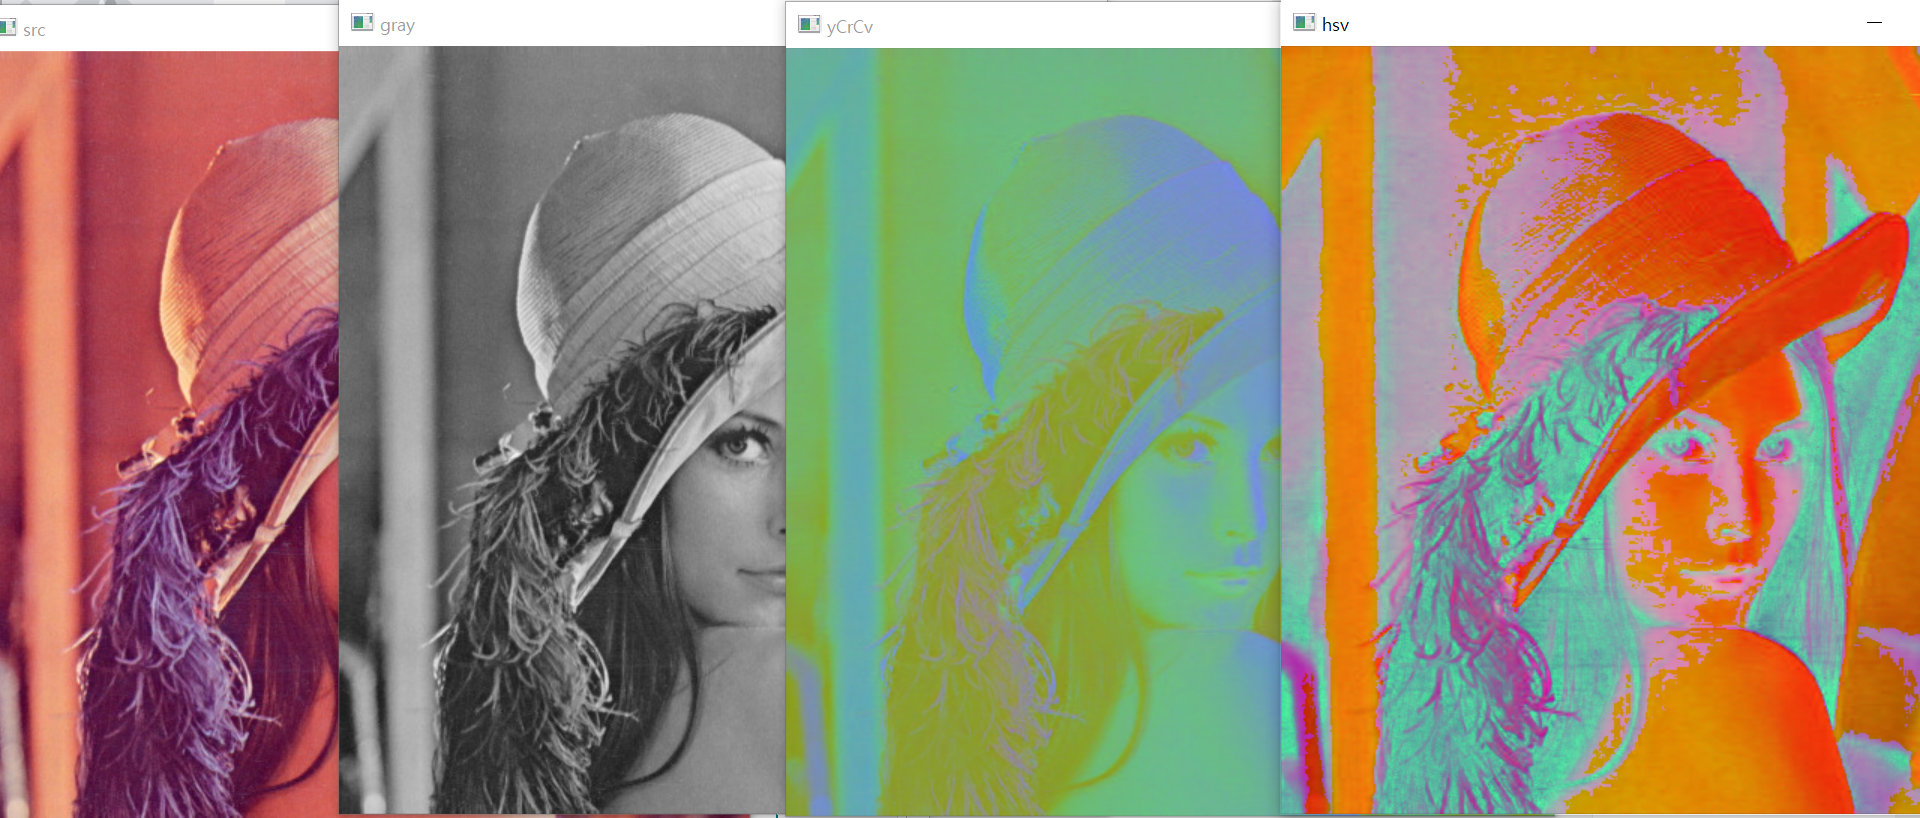
# 영상 기하 변환
- 크기 변환 (확대, 축소)
- cv2.resize
- 90도 간격으로 회전
- cv2.rotate
src = cv2.imread('./lena.jpg')

# 사이즈 변경
dst = cv2.resize(src, dsize=(320, 240))
dst2 = cv2.resize(src, dsize=(0,0), fx=1.5, fy=1.2)

# 출력해서 비교
cv2.imshow('dst', dst)
cv2.imshow('dst2',  dst2)
cv2.waitKey()
cv2.destroyAllWindows()
# 90도 회전
dst = cv2.rotate(src, cv2.ROTATE_90_CLOCKWISE)
dst2 = cv2.rotate(src, cv2.ROTATE_90_COUNTERCLOCKWISE)

# 출력해서 비교
cv2.imshow('dst', dst)
cv2.imshow('dst2',  dst2)
cv2.waitKey()
cv2.destroyAllWindows()
- 다각도로 회전 : cv2.getRotationMatrix2D
- 변환을 영상에 적용 : cv2.warpAffine
src = cv2.imread('./lena.jpg')
rows, cols, channels = src.shape

M1 = cv2.getRotationMatrix2D((rows/2, cols/2), 45, 0.5)
M2 = cv2.getRotationMatrix2D((rows/2, cols/2), -45, 1.5)
dst1 = cv2.warpAffine(src, M1, (rows, cols))
dst2 = cv2.warpAffine(src, M2, (rows, cols))

cv2.imshow('dst1', dst1)
cv2.imshow('dst2',  dst2)
cv2.waitKey()
cv2.destroyAllWindows()
imutils 활용
- 이동 : imutils.translate(img, tx, ty)
- 회전 : imuitls.rotate(img, angle=deg, center=(cx, cy))
- 크기변환 : imutils.resize(img, width=w, height=h, inter=interpolation)
# 설치
pip install imutils
import imutils
src = cv2.imread('./lena.jpg')
rows, cols, channels = src.shape
dst = imutils.translate(src, 10, 30) #위치변경
dst2 = imutils.rotate(src, 10, (rows/2, cols/2), 1.0) #회전
dst3 = imutils.resize(src, 700, 800) #사이즈 변경
cv2.imshow('dst', dst)
cv2.imshow('dst2', dst2)
cv2.imshow('dst3', dst3)
cv2.waitKey()
cv2.destroyAllWindows()
# 영상 기본 연산
- 사칙연산
- add, addWeighted, subtrack, scaleAdd, multiply, divide
# add
src1 = cv2.imread('./lena.jpg', cv2.IMREAD_GRAYSCALE)
src2 = np.zeros(shape=(512, 512), dtype=np.uint8) + 100

# 단순 플러스(+) 연산과 add 함수 결과가 다름
dst1 = src1 + src2  # 픽셀값이 255보다 클 경우 모두 255로 변환
dst2 = cv2.add(src1, src2)

cv2.imshow('dst1', dst1)
cv2.imshow('dst2', dst2)
cv2.waitKey()
cv2.destroyAllWindows()
# addWeighted (가중치 적용 결합)
src1 = cv2.imread('./lena.jpg')
src2 = cv2.imread('./baboon.jpg')

dst = cv2.addWeighted(src1, 0.5, src2, 0.5, 0)

cv2.imshow('dst', dst)
cv2.waitKey()
cv2.destroyAllWindows()
# subtrack
src1 = cv2.imread('./lena.jpg', 0)
src2 = np.zeros(shape=(512, 512), dtype=np.uint8) + 255
print('이미지1:', src1[0, :10])
print('이미지2:', src2[0, :10])

# 마이너스(-) 연산
dst1 = 255 - src1
print('255-이미지 :', dst1[0, :10])

# subtrack 함수 사용
dst2 = cv2.subtract(src2, src1)
print('subtract:', dst2[0, :10])

# 비교 함수 (마이너스 연산값과 subtrack 함수 값)
dst3 = cv2.compare(dst1, dst2, cv2.CMP_EQ) #  요소가 같음
print('CMP_EQ:', dst3[0, :10])

dst4 = cv2.compare(dst1, dst2, cv2.CMP_NE) # 요소가 같지 않음
print('CMP_NE:',dst4[0, :10])

dst5 = cv2.compare(dst1, dst2, cv2.CMP_GT) # 요소가 큼
print('CMP_GT:', dst5[0, :10])

dst6 = cv2.compare(dst1, dst2, cv2.CMP_GE) # 요소가 크거나 같음
print('CMP_GE:', dst6[0, :10])

dst7 = cv2.compare(dst1, dst2, cv2.CMP_LT) # 요소가 작음
print('CMP_LT:', dst7[0, :10])

dst8 = cv2.compare(dst1, dst2, cv2.CMP_LE) # 요소가 작거나 같음
print('CMP_LE:', dst8[0, :10])

n = cv2.countNonZero(dst3) # 0이 아닌 값 카운트
print('n=', n)

# 이미지1: [163 162 161 160 163 157 163 162 165 161]
# 이미지2: [255 255 255 255 255 255 255 255 255 255]
# 255-이미지 : [92 93 94 95 92 98 92 93 90 94]
# subtract: [92 93 94 95 92 98 92 93 90 94]
# CMP_EQ: [255 255 255 255 255 255 255 255 255 255]
# CMP_NE: [0 0 0 0 0 0 0 0 0 0]
# CMP_GT: [0 0 0 0 0 0 0 0 0 0]
# CMP_GE: [255 255 255 255 255 255 255 255 255 255]
# CMP_LT: [0 0 0 0 0 0 0 0 0 0]
# CMP_LE: [255 255 255 255 255 255 255 255 255 255]
# n= 262144
#결과 같음
cv2.imshow('dst1', dst1)
cv2.imshow('dst2', dst2)
cv2.waitKey()
cv2.destroyAllWindows()
